Support Us: Please visit our sponsors

.Mac (Apple Computer, Inc.)

Sponsor

Apple iTunes
Showing posts with label home studio. Show all posts

Thursday, January 31, 2008

Building A Home Studio, Revisited

Sound and Recording
B. Thomas Cooper
Editor

Once upon a time, not too long ago, mind you, building a respectable home studio' required a rather substantial investment in time and money.

Back in the day, so to speak, we were still recording in analog, and a decent eight track tape machine cost a few thousand dollars at a minimum. Then there was the console (desk, mixer, etc.) consisting of perhaps twenty-four channels, which cost another couple grand. Of course, no home studio was complete without at least a couple racks of outboard gear. We had doozles and raddoids and multiple compressors and delay devices, each guaranteed to muddy up the mix. All of this was then routed together with cables and wires and strewn about in disarray. Getting it all to sound good was never an easy task.

nick_drums
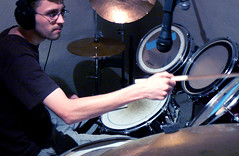
Nick Gill in Studio A

These days things are little different. The advent of digital technology has changed much about how we record sound and music. Oh, we still have our share of doozles and raddoids, but now they are called add-ons' and they are included with the recording software. Most of the clumsy cables have long been chucked into the trash. We like to run a clean shop

Over the years, I have designed and overseen the construction of countless studios. It's one of those things I do. From coast to coast, from sea to shining sea. Big rooms, little rooms they are all the same. The trick is to create an environment conducive to the recording process. The best advice I can give is learn to keep your sound pressure levels under control. Deafening volume levels are not a good idea in small enclosures. When in doubt turn it down.

There are numerous companies offering digital recording software at reasonable prices. The choice is yours. For starters, I recommend Sonar for the initial recording process and Sound-Forge for the mastering process. It's really not as hard as it sounds, and these days even a caveman like myself can afford it.

In any studio, a bad headphone mix is as inexcusable as it is predictable. How in the name of Marilyn Manson can anyone expect to lay down strong basic tracks if you can’t hear what the other musicians are doing? The same holds true for the overdub process. A musician is only as good as his (or her) ears. If the sound in your cans doesn’t rock, your not apt to perform at your best.

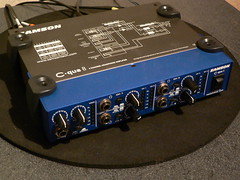
For this, I recommend Samson 4 C-que 8 headphone amplifier, ideal for small studio applications, addressing many of the problems associated with typical inferior headphone mixes.

With a retail price of around $149.00, the Samson 4 C-que 8 is a safe and affordable solution. It fits nicely on the desk or console, and my unit has yet to throw me any curves. This is a quality device with no apparent drawbacks. I would recommend the Samson 4 C-que 8 to anyone serious about their workstation or studio headphone mixes.

Obviously, you will also need reliable headphones. Again, you are only as good as your ears can hear. I suggest a couple pairs of Sony V600’s These are a fine offering by Sony, a sturdy set of headphones, with firm, comfortable ear pieces and a warm, desirable frequency response. In simple words… a good investment for anyone looking for a reliable set of headphones.

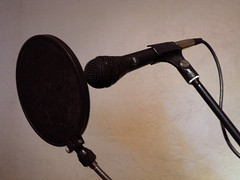
You will also need an array of dependable microphones, but this subject is covered in great depth in a separate article. Also available at Helium. If you are new to recording, take a few minutes and read a few articles on the subject. You just might learn something!

Monday, January 14, 2008

Choosing Furniture For Your Studio

Sound and Recording
B. Thomas Cooper
Editor

During my thirty plus years of recording, the subject of studio furniture has never been the hot topic of conversation. Understandably, of course. Who can really say for certain what kind of furniture is appropriate for a recording studio?

Still, myths abound. As such, I see where room for some clarification may be in order. For starters, very few studio settings are alike. There are basic rules governing sound re-enforcement, but frankly, the door is wide open. What you do once inside, is really up to you.

Admittedly, there are aesthetic considerations, but these are always trumped by the sonic properties of the room. Black leather couches are all but standard in most major studio lounges, but one must learn to differentiate the studio from the lounge. Even with a digital workstation such as mine, neither the gear, nor the most comfortable furniture will greatly effect the performance of the musicians.

Remember, these are the same cats sleeping on some drum riser in Fresno, or on a table backstage in Detroit. I kid you not when I say I have seen a clean, well organized studio throw some musicians into a funk, not unlike a fish out of water.

True, it’s nice to feel at home when recording, but let’s be practical, shall we.
Wood paneling provides a soft, warm sonic solution. Carpet, bass traps, baffling, etc. should also be realistic considerations. As for the couch, I suggest you leave it in the lounge, as most musicians do not play their best when sprawled out. It’s simply bad science.

I recommend tables close to the ground and away from sensitive equipment. Trust me on this. Spills will happen, and they will happen often. Ash trays and beer bottles topple with regularity. You can keep some stuff out of the room entirely, but something always slips through the cracks. Just be prepared.

In closing, choose you studio furniture based on your pragmatic needs rather than aesthetics. Be confident, be comfortable, and by all means, enjoy the experience.

Monday, December 17, 2007

Exploring Pre-Production (Things to do in Preparation for a Recording Studio Session)

Sound and Recording
B. Thomas Cooper
Editor

As we have touched on in previous articles, properly preparing for a studio recording session is unlike preparing for a live gig. Each present a unique set of variables, both which we desire to attain at least some degree of understanding, and perhaps eventually even mastery.

A band should be well rehearsed before entering the studio. Know your material well. Work on getting your lyrics down straight and your parts as tight as possible. Take some time to define the melodies and any harmonies. Be sure the drummer and bass player are playing in the pocket.

As a staff producer for the world famous Power Station Studios, I quickly gained a reputation for pushing the song, rather than the players. Divorce yourself from your ego and play for the song. This is what the great one’s do best, and they do it instinctively.

I strongly suggest recording rehearsal whenever possible. I also suggest you get in the habit of playing along to a click track, or metronome sooner rather than later. Being in my late forties, I’ve heard every stupid excuse imaginable for not playing to a click track. My advise? Get over it!

There are other considerations. How familiar are the musicians with playing with headphones? Different music requires radically different headphone mixes. This alone can determine whether the session is a success or a failure, and is far too often overlooked.

On occasion, young bands would show up at the studio with a record deal, but no drumsticks or guitar strings. Needless to say, these bands had not been doing any serious pre-production. Show up prepared. If your drummer needs new drum heads, by all means, buy them. Procure extra strings, and rehearse. It is not a crime to relax before a session, but don’t over party. The studio is your chance to shine, through your recordings, rather than in spite of them.

Monday, October 1, 2007

More Tips For Recording Vocals

Sound and Recording
B. Thomas Cooper
Editor

When it comes to recording vocals, misconceptions abound. So many wonderful singers, so little dependable information. We are all instantly capable of recognizing a strong vocal performance, but what goes into capturing that performance usually isn't so obvious.

It all starts with a good singer and a good song. From there, choose a reliable microphone. Many engineers prefer using large diaphragm condenser microphones, but I have no preference. After thirty years of intensive studio experience I have learned to rely on the vocalist, not the microphone. While working as a staff producer at the world famous Power Station Studios, I had at my disposal, nearly every mic imaginable. One quickly learns that not every vocal should be captured with an expensive ribbon mic. Think hard about what it is you're trying to accomplish. Feel free to experiment.

sound and recording

Remember, good microphone technique and proper singing habits will profoundly effect your vocal performance. A mic can only capture what you produce. Once the performance has been captured, it can be enhanced through various means, including reverb, compression, etc. but all the reverb in the world will not drown out a bad performance.

Singers tend to be a finicky lot, a fact I can personally attest to. Still, no two vocalists are alike. Do whatever it takes to make the singer comfortable and confident. A good headphone mix is crucial. If you can't hear what your doing, you stand little chance of doing it well. I can honestly say the Power Station had the best headphone systems I have ever experienced. It is little wonder to me why the studio produced so many hit records.

From here, things get somewhat slippery. A producer like Terry Date will not approach a vocal for the Deftones in the same manner Jim Steinman might approach a Meat Loaf recording. Even at the highest levels of the industry, approach can be radically different.

Unless all indications suggest to the contrary, go with the flow. In other words, don't rock the boat. Learn all you can about recording, and keep an open mind. A vocal track can make or break an otherwise average recording. It is our goal to recognize the difference.

Tuesday, August 21, 2007

Recording Drums and Percussion

Sound and Recording
B. Thomas Cooper
Editor


nick_drums

Recording drums and percussion instruments can be tricky at times. Every sound engineer has his own story to tell. Noisy symbols, poorly tuned drum heads, questionable room acoustics etc. All can contribute to the chaos, a kind of sonic dysentery. We can't actually cure the disease, but we can treat the symptoms.

The underlying problem can be attributed to those pesky transients. No, not the ones under the overpass. Transients are those sounds that come out of nowhere, like the crack of a snare drum, a sudden burst of signal, or the grinding smash of a distorted guitar or a crash symbol. Drum related transients often tend to be especially problematic. So where do we begin?

For starters, new drumheads and a decent pair of drumsticks seems obvious, but never overestimate a musicians common sense. Invest in your craft. You are only as good as your tools. Dampening the drums heads is often necessary, but certainly not mandatory. When recording, capturing a workable signal is tantamount. Learn to strike your drums in a manner conducive with good sound management. Pardon my saying so, but garbage in, garbage out.

Next, let's go over room acoustics, as a bad room adversely effects those afore-mentioned transients, and any listeners within earshot. A live' sounding room, like a garage or a nite-club will be subject to various bounce back' issues, such as unwanted room echo or worse yet, the dreaded square wave'. You can't see it, but it's stalking your studio, even now. The louder you play, the angrier it gets. Acoustic treatments will usually do the job, but each room is different. Sound baffling, bass traps etc. all play an important roll, but ultimately, it's up to you to get it under control.

Finally, we reach the subject of microphone placement and technique. The possibilities are limitless, so I'll cut to the chase. The more microphones you set up, the more sounds you must dial in. Some engineers can successfully mic an entire drum kit with a pair of overhead room mics, but as a rule, I recommend a minimum of at least four, adding a mic for the kick drum, and another for the snare. The overhead microphones can be adjusted to pick up signal from the toms and the symbols. The two produce radically different signal response, so crosstalk and cancellation usually aren't a factor.

Here's something to keep in mind. Most drum isolation booths are far more trouble than they are worth, so don't bother. The drums are the foundation upon which your song is being constructed, so set them babies up in the big room. Let the guitarist set his rig up in the iso' booth, as his tracks may need to be re-recorded later anyway. Today, it's all about the drums.

Keep an open mind and learn all you can about your craft. Leave your ego home, and play what is best for the song. Recording music is really not that hard, but capturing the magic often takes a little time. Just keep banging away, and by all means, enjoy the process.

Thursday, June 21, 2007

Recording Drum Tracks

Sound and Recording
B. Thomas Cooper
Editor

nick_drums

Recording drums and percussion instruments can be tricky at times. Every sound engineer has his own story to tell. Noisy symbols, poorly tuned drum heads, questionable room acoustics etc. All can contribute to the chaos, a kind of sonic dysentery. We can't actually cure the disease, but we can treat the symptoms.

The underlying problem can be attributed to those pesky transients. No, not the ones under the overpass. Transients are those sounds that come out of nowhere, like the crack of a snare drum, a sudden burst of signal, or the grinding smash of a distorted guitar or a crash symbol. Drum related transients often tend to be especially problematic. So where do we begin?

For starters, new drumheads and a decent pair of drumsticks seems obvious, but never overestimate a musicians common sense. Invest in your craft. You are only as good as your tools. Dampening the drums heads is often necessary, but certainly not mandatory. When recording, capturing a workable signal is tantamount. Learn to strike your drums in a manner conducive with good sound management. Pardon my saying so, but garbage in, garbage out.

Next, let's go over room acoustics, as a bad room adversely effects those afore-mentioned transients, and any listeners within earshot. A live' sounding room, like a garage or a nite-club will be subject to various bounce back' issues, such as unwanted room echo or worse yet, the dreaded square wave'. You can't see it, but it's stalking your studio, even now. The louder you play, the angrier it gets. Acoustic treatments will usually do the job, but each room is different. Sound baffling, bass traps etc. all play an important roll, but ultimately, it's up to you to get it under control.

Finally, we reach the subject of microphone placement and technique. The possibilities are limitless, so I'll cut to the chase. The more microphones you set up, the more sounds you must dial in. Some engineers can successfully mic an entire drum kit with a pair of overhead room mics, but as a rule, I recommend a minimum of at least four, adding a mic for the kick drum, and another for the snare. The overhead microphones can be adjusted to pick up signal from the toms and the symbols. The two produce radically different signal response, so crosstalk and cancellation usually aren't a factor.

Here's something to keep in mind. Most drum isolation booths are far more trouble than they are worth, so don't bother. The drums are the foundation upon which your song is being constructed, so set them babies up in the big room. Let the guitarist set his rig up in the iso' booth, as his tracks may need to be re-recorded later anyway. Today, it's all about the drums.

Keep an open mind and learn all you can about your craft. Leave your ego home, and play what is best for the song. Recording music is really not that hard, but capturing the magic often takes a little time. Just keep banging away, and by all means, enjoy the process.

Friday, April 27, 2007

Product Review: Samson C-que 8

Sound and Recording
B. Thomas Cooper
Editor


Samson C-que 8
4 Channel Headphone Amp


Features:

Four channel headphone amplifier with individual controls for each channel.
Ideal for digital-audio workstations or studios.

Dual headphone outputs, front and rear. Plus one front panel output per channel, allowing for a total of eight headphones at one time.

Separate Left and Right line inputs for master stereo bus.

2-channel / Stereo mode switch.

Samson
Samson C-que 8


This versatile little headphone amp
, one of Samson’s C Class Signal Processors, delivers as promised. Indeed, the C-que 8 is ideal for small studios, addressing many of the problems associated with typical inferior headphone mixes.

A bad headphone mix is as inexcusable as it is predictable. How in the name of Marilyn Manson can anyone expect to lay down strong basic tracks if you can’t hear what the other musicians are doing? The same holds true for the overdub process. A musician is only as good as his (or her) ears. If the sound in your cans doesn’t rock, your not apt to perform at your best.

With a retail price of around $149.00, the Samson 4 C-que 8 is a safe and affordable solution. It fits nicely on the desk or console, and my unit has yet to throw me any curves. This is a quality device with no apparent drawbacks. I would recommend the Samson 4 C-que 8 to anyone serious about their workstation or studio headphone mixes.

Sunday, April 15, 2007

Building a Respectable Home Studio

Sound and Recording
B. Thomas Cooper
Editor

Once upon a time, not too long ago, mind you, building a respectable home studio' required a rather substantial investment in time and money. Back in the day, so to speak, we were still recording in analog, and a decent eight track tape machine cost a few thousand dollars at a minimum. Then there was the console (desk, mixer, etc.) consisting of perhaps twenty-four channels, which cost another couple grand. Of course, no home studio was complete without at least a couple racks of outboard gear. We had doozles and raddoids and multiple compressors and delay devices, each guaranteed to muddy up the mix. All of this was then routed together with cables and wires and strewn about in disarray. Getting it all to sound good was never an easy task.


These days things are little different. The advent of digital technology has changed much about how we record sound and music. Oh, we still have our share of doozles and raddoids, but now they are called add-ons' and they are included in the recording software. Most of the clumsy cables have long been chucked into the trash. We like to run a clean shop around here.

Over the years, I have designed and overseen the construction of countless studios. It's one of those things I do. From coast to coast, from sea to shining sea. Big rooms, little rooms they are all the same. The trick is to create an environment conducive to the recording process. The best advice I can give is learn to keep your sound pressure levels under control. Deafening volume levels are not a good idea in small enclosures. When in doubt turn it down.

There are numerous companies offering digital recording software at reasonable prices. Take your choice. For beginners, I would recommend Sonar for the initial recording and SoundForge for the mastering process. It's really not as hard as it sounds, and these days even a caveman like me can afford it.

Sponsor

TigerDirect

Sponsor

Netflix, Inc.